Friday, January 26, 2018

FW Club Information

I have so much to share with you about the FW club things this week.  Okay, let's get started.

The Quilt Patch has gotten in the Robert Kaufman Singer fabric that we've been wanting.  It's just in time for the FW case cover class coming up in a couple of months.... Yippee.  Isn't this fabric just gorgeous.  I used the FW on white for my case but I'm thinking the lining in the black and gold would be stunning.  Stop by to get what you'll need.  Go over to the class schedule page here and check out what's posted at this point.  I'll get a little more posted soon.  I'm putting together some sample things for class and will update the materials list as I go along. I've posted the amount of fabric you'll need so you can get that before the shop is sold out.

You'll be able to purchase the double sided fusible Bosal that's needed for the case and webbing for straps and zippers at the Quilt Patch soon.  She's getting ready for us.  And, I think this class will fill up quickly so give the shop a call and get your name on the list.  (Quilt Patch  517-423-0053)

FW Club Class is coming up next week.  Again, go over to the Class Schedule page to see what you'll need to bring.  We're planning on polishing up our pretty FWs this month.  I can't wait to see all of them sparkly and shiny.

Okay, I'm so busy trying to get everything ready for the classes.  Send me an email if you have questions.  jdquilts123@yahoo.com.

Wednesday, January 17, 2018

Here's a little Binding tip

Good morning, my quilting friends.  I hope you are staying warm this fine day.  We're a chilly 1-degree at the moment.  If I were in Juneau, Alaska it would be 40-degrees outside.  Well, not to worry, when it's this cold I tend to hole up in my sewing corner and sew away.


But, this post is not about me, per se, it's about how to make the sewing on of the binding a little less stressful.

To start with, I always use bias binding.  There's lots of reasons for that.  Bias binding will curve if you need it to curve, or stretch just a bit to keep tucks from forming.  The main reason I like bias binding though is that it's so much more sturdy to protect the edge of the quilt.  When you put straight of grain binding on, there is just one thread running along the edge of your quilt where it gets the most wear.  I can't tell you how many vintage quilts I've seen where the binding has split apart along the edge due to our grandmothers and great aunts using straight of grain binding.  With bias, you have hundreds of threads criss-crossing that edge so they tend to hold together as a group so much better.  You remember that old phase don't you, 'strength in numbers'?  It's true here as well.

The problem I have with cutting bias for binding is that after I get enough binding cut for my quilt, I have this piece of fabric left with that big bias cut.  I know, I could do the bias in a tube thingy where you don't end up with that bias cut but I'm not so fond of that method.  It takes a bit longer for me to mark all those lines where you cut with your scissors but mostly I don't like the bias seams so close together and you can't avoid that with that method.  Anyway, I've solved the problem of having that strange bias cut piece by just using it all up to make more binding.  I'll probably use it on a donation preemie quilt or a small project.  Sometimes I'll cut a bunch of binding just because I use a lot of one color.  I use a lot of black binding so having a ton of it all ready to sew on makes it easier for me in the long run.

So, now is the time where I have to figure out how to store this extra made binding so it doesn't get wrinkled and tangled up.  Okay, you've seen those cute little 'binding buddies' for sale in a few places, right?  They look like a big wooden spool that has a ball on the end painted like a face.  They are cute but pricey and I'd have to buy a bunch of them for all the bindings that I've made up.  I tend to be a bit of a penny pincher so before I ever saw those binding buddies,  I had a brainstorm to use a toilet paper roll, a paper towel roll or, a wrapping paper roll.  I just wrap the paper roll with my binding and pin it in place. 

But here's my newest idea that I want to pass along.  Even with my neatly wrapped rolls of binding I still had the problem of managing the roll while I'm sewing on the binding.  ***  Idea***  Why not use one of those paper towel holders to put the binding roll on so it will unroll while I'm sewing?  Hey, it worked.  I didn't have a paper towel holder but I did find a little pewter condiment dish with a tall center pole that works just fine.  It's heavy enough to support my roll of binding and those little condiment bowls can hold something in my sewing corner that is useful, too.  Win-win I'd say.

Sorry but I don't have a tip about the hand stitching part.  Well, maybe I do.  I use those little clips to fold the binding all around the quilt before I sew.  I have a lot less needle pricks now than before I used those.

Okay, on to the sewing corner.  You have a great day.

Wednesday, January 10, 2018

Some info about the number of FW machines made and a little tip, too.


I looked up some information about how many featherweight machines (Singer 221) were made over the years and realized how lucky I am to own one of the white FWs.  You all know that the FW 221 was first made in 1933 and in the middle 1960s production stopped on the most successful of the Singer models made.  We're still trying to find them, right?

The black machines are common because over 2 million were made.  The FW 222, often called the free arm featherweight, were made in the 1960's but not for the US market.  There were almost 109,000 of those made.  But the little white and celery green machines only added up to 60,000 machines made.  The information on the tan machines is not available.  There are several minor differences in the white machines but they are hard to find.  If you have one, cherish it.

I was able to purchase another black machine a couple of weeks ago and found something interesting that I thought I'd pass along to all of you.  This machine was missing a motor belt and I had to put a new one on it but when I looked carefully at the motor shaft I discovered that there was thread wrapped around the shaft.  And it wasn't a small amount of thread.  I carefully got hold of the thread and started unwinding it. .... and unwinding it...... and unwinding it.  Oh my!  I had two handsful of thread that came off the shaft.  Then,  I took my little light and looked more carefully behind the belt area and found more thread.  That poor machine was so bound up with thread that I'm not sure she would have worked well at all.  Of course, after I got all the thread out, I oiled her up, greased her and put on a brand new belt.  She's a happy sewer now.

So, maybe it would be a good idea to take a bright light and check around the belt area to see if there is any thread wrapped around the motor shaft.  During our FW Club Class this week I mentioned this to the gals that were there and guess what?  We found a couple of machines that also had thread wrapped around the motor shaft.  So, check yours.  An unhindered motor is a happy motor.


Friday, January 5, 2018


BRRRR!!  Is it cold enough for you?  The outside thermometer read -4 this morning.  That's cold enough for me.  But it's too cold to snow at the moment here at my house. We have more snow at the moment than this picture shows but it's a nice view from the porch. Of course it's too cold for any snow to melt from the last dumping.  Snow will move in when the temps start to climb up again.  I'll be happy to have a bit warmer temps but not super happy about the snow.  My thoughts go to those on the East coast at the moment with the blizzard they are having. I do hope you all have furnaces that work well and you are staying safe in these temperatures.  And if you're living in a warm or hot area, disreguard all of this talk about cold weather.  Just know,  I'm a little jealous.

But, cold weather means that many of us get to stay inside and sew.  And, as soon as I get caught up on the post holiday things that's exactly what I'll do.  I've made my 'QUILTS TO MAKE OR WORK ON' list for this year and now I need to start getting those UFOs finished and out of my sewing corner.  I have a few featherweights that I need to clean up, do some minor repairs and get listed on my 'for sale' tab.  I'm looking ahead to our flea market season where I'll have those FWs and other sewing things to sell.  I'll let you know about the Mason and Jackson flea markets coming up soon.

Today I'm off to teach the FW Club class for January and we have some fun things this time.  I put together an easy quilted bed extension cover that will protect the finish on the extension plate when you put the machine in the case.  Do you have the problem of the extension plate hitting the screw that holds the face plate on?  One of these covers would solve that problem.  After our class today and Sunday, I'll post the instructions on making the cover for everyone.  I'm going to make several of these for my machines and possibly have some for sale later.  We're also going to learn how to fix the problem of the needle going up and down when you're winding the bobbin.


And, I tried a new recipe last night for Minestrone soup.  This is soup weather for sure and I love trying something different.  This is easy to make, quick to get on the table and really yummy.  I could put it in the recipe section and maybe I'll do that later but I'll post it here for anyone that would like to try it on a chilly winter night.

MINESTRONE SOUP
1 Tbsp. Canola oil
12- oz pre-cooked smoked sausage or use a pre-cooked Italian flavored one
1 28-oz can diced tomatoes with Italian herbs
1 15-oz can garbanzo beans (chickpeas), rinsed and drained
2-3 cups reduced-sodium chicken broth or more to get the right amount of 'soupy'
1 medium yellow sweet pepper, chopped
2 tsp. Italian seasoning
1 cup dry rigatoni pasta
2-3 cups baby spinach
Shredded  Parmesan cheese

1.Cut the sausage in 1/4" slices.  In a Dutch oven or large pot, brown the sausage in the oil until lightly browned.  Add the diced tomatoes, drained beans, chicken broth, sweet pepper and Italian seasoning.  Bring to a boil

2. When boiling, add the pasta and turn down the heat until the soup is just simmering.  Cook for 10-15 minutes stirring occasionally until the pasta is cooked to barely tender.

3.  Turn the heat off and add the spinach, stirring into the soup to cause it to get limp.

4. Ladle into individual bowls and top with  shredded Parmesan cheese.

Makes 4-5 servings.

I served this with a fresh salad and some Focaccia bread.  I'll make this for dinner again soon.  Everyone loved it.

Okay, I'm off to get ready for my class.  I hope you'll be joining us.  If not, stay tuned.  I'll give you a followup on the FW Club tab when the classes are done.  And, I hope to take a few pictures of the ladies working on their sweet machines.

Have a good day.
Tuesday, January 2, 2018

Time for Reflection and Planning Ahead

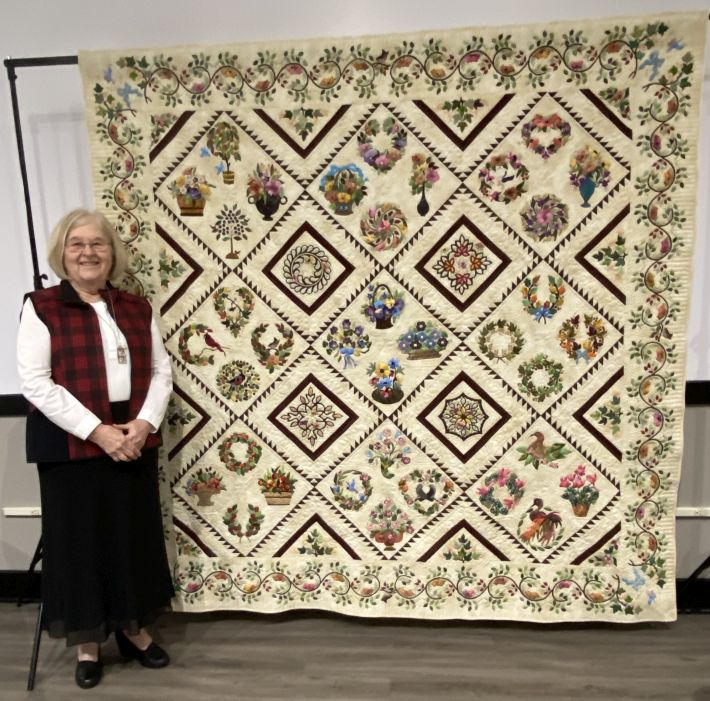
Happy New Year, Everyone.  I look at my calendar and think, WoW!  It's 2018 already.  My thoughts go back to the quilts I made this past year and the planning begins for finishing quilts in progress and starting new ones.

I think the two most memorable quilts I made in 2017 are the owl quilt I made for my newest grand niece and the mystery quilt I designed to teach last spring.  Lone star centers are fun to make but so challenging to get 'just right'.
This owl quilt was a fun quilt to make.  The owls were from a potholder pattern and the rest just came out of my head.  I used mostly stash fabrics for this one. I decided to try a flange binding on the owl quilt.  It was just FUN.... and all machine.  That's always a plus.  Let me know if you're interested in a tutorial for the flange binding.


The mystery quilt was quite an undertaking with the lone star center and then who knew what after that.  I do love the primitive look to this quilt but when I taught the class there were so many different fabric choices that people used.  Oh my, how it changed the look of each quilt.  And for me, this is a special quilt because it's the first full sized quilt to long arm stitch on my Handi Quilter known to me as Queen Heidi.  I don't know why I picked that name, but she is a regal machine that I'm working hard to master LA quilting.

My machine has a computer so I was able to do both machine work and some free-hand quilting as well.  Don't look too closely.  I'm still learning.

I also made an Easter mystery quilt in pastels and bunnies in place of the crows.  I appliqued Easter eggs in one of the borders as well.  I'm still working on that quilt but it's close to finished.  I hope to finish it before Easter so I can enjoy it during that holiday season.  I'll keep you posted.

Okay, that's some of my favorite quilts that I made this past year.  So, what's in the quilting future for me in 2018?  The biggest project I will do this year is a wedding quilt for my grandson and his fiance.  He popped the question this Christmas so there's a wedding in the future.  They tell us it won't happen until the spring of 2019 so I do have time to design and create a very special quilt for them in this upcoming year.  I'm sure you're going to hear more about it on my blog.  Maybe you can give me suggestions on how to create it.

So, today is going to be a busy one because it's time to start the un-decorating and put up the Valentine's Day things.  And, of course this is a Featherweight Club Class week.  I'll put the finishing touches on the handouts for class and be thinking about it all week.  I love teaching the FW Club classes.  If you're in the NE Ohio or SE Mi area think about joining us.  We sure do have a fun time and it's always good to learn just a bit more about these amazing machines.  Check on the schedule tab for all the details.

So, again, HAPPY NEW YEAR!!  Stop by often.  I do hope to get back on schedule with posts and you all can comment or send me any question or message at my email address.

jdquilts123@yahoo.com